Mountain Drawing - Simple Steps For Amazing Landscapes
There is something truly captivating about towering landforms that reach for the sky, isn't there? These majestic giants, with their rugged peaks and sweeping valleys, have long held a special place in human imagination, inspiring countless stories, songs, and, very naturally, a great deal of visual art. It is no surprise at all that these grand formations are a well-loved topic for creative expression of many kinds.
For some, the thought of trying to capture such immense beauty on paper might seem a bit much, perhaps even a little daunting. However, it's actually a rather straightforward and simple activity that anyone can take up. Learning to depict a mountain can be a wonderful visual device, allowing you to create scenes that hint at truly vast stretches of open space and distant horizons. You might be surprised at just how quickly you can get the hang of it, too it's almost like magic.
This little guide aims to walk you through the process, offering a friendly approach to putting these natural wonders onto your page. We will go over some simple methods that will help you sketch these impressive forms, giving you a solid base for adding them to your own pictures. So, if you've ever felt a pull to draw these grand features of our planet, you're certainly in the right spot, as a matter of fact.
Table of Contents
- Why Draw Mountains?
- Getting Started with Mountain Drawing Basics
- What Tools Do You Need for Mountain Drawing?
- The Initial Steps for Mountain Drawing
- How Can You Learn Mountain Drawing Step-by-Step?
- Adding Depth to Your Mountain Drawing
- Where Can Beginners Find Mountain Drawing Guidance?
- Exploring More Mountain Drawing Concepts
Why Draw Mountains?
You might wonder why so many artists, both new and seasoned, choose to put mountains on their paper or canvas. Well, these immense structures offer a unique blend of quiet strength and powerful visual appeal. They stand as enduring symbols of nature's grandeur, frequently suggesting quiet solitude, or perhaps a challenging ascent. When you include them in your artwork, you're not just drawing a shape; you're, in a way, capturing a feeling, a sense of quiet majesty that speaks to something deep inside us all. They tell a story without saying a word, really.
Drawing these impressive landforms also gives you a fantastic chance to play with ideas of scale and how things look far away. A picture with a mountain in the background can instantly make the foreground feel closer, creating a sense of how much space there is between what's near and what's distant. This helps your picture feel more real and lived-in, quite frankly. It's about making your viewer feel like they could step right into the scene, almost.
Furthermore, the varied textures and shapes of these landforms provide endless creative opportunities. From jagged, rocky peaks that seem to pierce the sky, to gentler, rolling hills covered in trees, each one offers a different set of contours and surfaces to explore. You might find yourself drawn to the sharp edges of a craggy summit, or perhaps the soft, rounded slopes that seem to invite quiet contemplation. This variety, naturally, keeps the drawing process fresh and exciting, always offering something new to discover with your pencil.
Also, the way light interacts with these huge structures is truly something to behold. Think about how the sun catches a peak at dawn, casting long, interesting shadows across the valleys below, or how a cloud might drape itself over a ridge, creating a soft, diffused light. Capturing these moments of light and shadow is a wonderful exercise for anyone looking to improve their artistic skills. It teaches you how to see and represent three-dimensional form on a flat surface, which is, in fact, a pretty big deal for any kind of picture-making.
Getting Started with Mountain Drawing Basics
Starting to draw a mountain is, truly, a rather simple process, and it does not need to feel complicated. It is a very accessible way to begin creating pictures that suggest expansive spaces and faraway places. You can think of it as a helpful visual aid for giving your pictures a sense of depth and distance. When you first look at a mountain, you might see just a large, imposing shape, but breaking it down into smaller, manageable parts makes the drawing process quite straightforward, as a matter of fact.
The core idea behind making a picture of a mountain is to represent its basic form and outline. You are aiming to capture its general shape, how it rises from the ground, and how its peaks reach upwards. This activity can be a wonderfully calming and enjoyable way to spend some time, too. It is not about making a perfect replica, but rather about getting the feel of the mountain onto your paper. You are essentially creating a visual shorthand for these grand natural features, which is, you know, pretty cool.
For those who are just starting out, this kind of picture-making is an excellent way to practice basic sketching skills. It encourages you to observe general shapes and relationships before getting caught up in smaller details. You might find yourself noticing the gentle curve of a slope or the sharp angle of a peak, which, quite frankly, helps train your eye to see forms in a more artistic way. It is a fundamental step in learning to draw any kind of scene, giving you a solid foundation for more involved projects later on.
Moreover, including these landforms in your drawings can instantly add a feeling of vastness and openness to your pictures. They provide a backdrop that hints at a much larger world beyond the immediate scene. This can be particularly useful if you are trying to create a sense of quiet solitude or perhaps a grand adventure. The presence of a mountain, you see, changes the entire mood of a picture, making it feel more complete and immersive. It is a simple addition with a very significant impact, quite honestly.
What Tools Do You Need for Mountain Drawing?
You might be wondering what sort of things you will need to begin your mountain drawing adventure. The good news is that you do not need anything particularly fancy or hard to find. In fact, you likely have most of the necessary items already lying around your home or office. Keeping things simple at the start allows you to focus on the act of drawing itself, rather than getting caught up in searching for specialized equipment, which is, you know, quite helpful.
At its core, all you truly need is something to make marks with and a surface to make them on. A regular pencil, perhaps a HB or a 2B for a bit more softness, is perfectly suitable for sketching the initial shapes and lines. These pencils are quite versatile, allowing you to create both light, airy strokes and darker, more defined ones. You do not need a whole set of different lead types, just one or two will do the trick, really.
As for the surface, any plain paper will work just fine. A standard sheet of printer paper is a great place to start, or perhaps a simple sketchpad if you happen to have one. The idea is to have a space where you feel comfortable experimenting and making mistakes, because that is, after all, a big part of learning. You are not aiming for a masterpiece on your first try, but rather to get comfortable with the motions and shapes, naturally.
An eraser is also a very handy companion to your pencil and paper. It allows you to lighten lines that are too dark, or to remove parts of your drawing that you want to change. Do not be afraid to use it; it is a tool for correction and refinement, not a sign of failure. Sometimes, in fact, the act of erasing and redrawing can help you understand the form better. So, a basic rubber eraser, or perhaps a kneaded one if you prefer, will serve you very well, too it's almost a must-have.
Beyond these basics, you could consider adding a blending tool, like a tortillon or even just your finger, to smooth out shaded areas, or maybe some charcoal or pastels if you want to experiment with different textures and tones later on. However, for just getting started with mountain drawing, a pencil, paper, and an eraser are honestly all you truly need to begin putting those majestic shapes onto your page. It is really quite straightforward, in fact.
The Initial Steps for Mountain Drawing
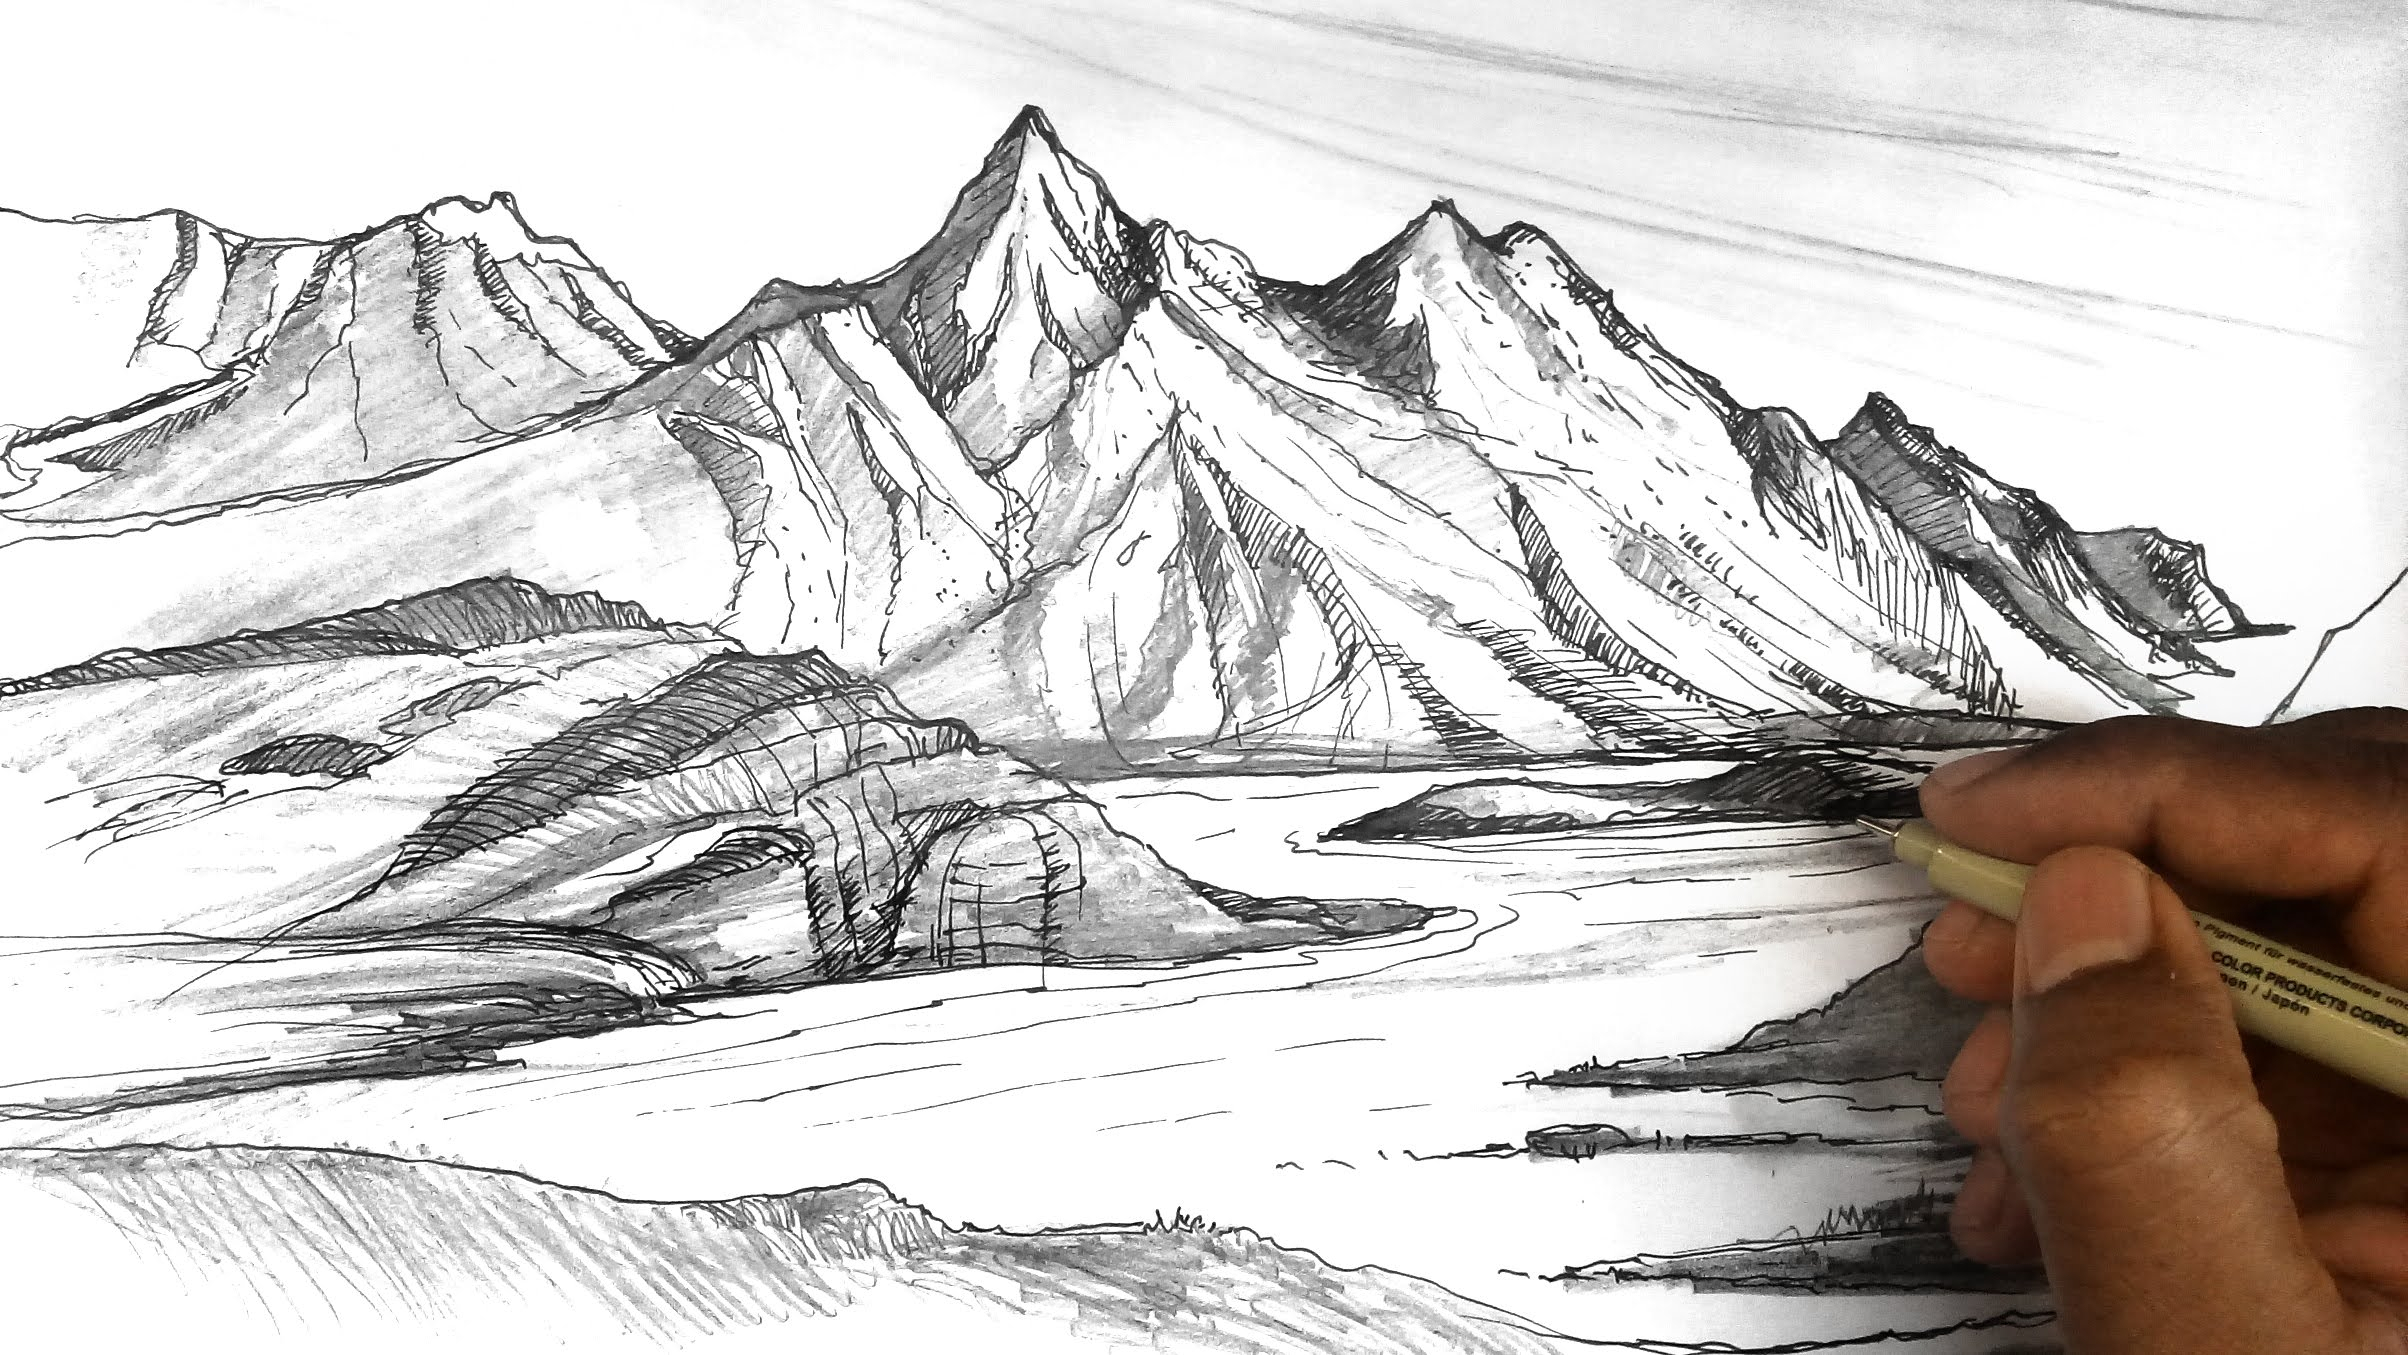
Once you have your basic tools ready, the very first step in making a picture of a mountain is to sketch out its overall form. You are not trying to draw every tiny rock or tree at this point; instead, you are aiming to capture the general silhouette and how the mountain sits on the land. Think of it as drawing the biggest, simplest shape first, like a big triangle or a series of connected peaks. This initial outline helps you get the proportions right before you add any more detail, which is, you know, pretty important.
Start with light, loose lines. You do not want to press down too hard, as these lines are just guides and you might want to adjust them later. Try to capture the highest points and the lowest dips of the mountain range. Is it a single, towering peak, or a series of rolling hills that gently rise and fall? Getting this basic structure down accurately will make all the following steps much easier, frankly. It is about building a solid framework for your picture.
Consider the base of the mountain as well. How does it meet the ground? Does it have a wide, stable foundation, or does it seem to shoot up steeply from a narrow point? This connection to the ground is a surprisingly important part of making your mountain feel grounded and real in your picture. You might even lightly sketch in the horizon line to give your mountain a place to stand, which can be quite helpful, you know.
You can also think about the overall flow of the mountain range. Do the peaks lean in one direction, or do they spread out in a more balanced way? Capturing this general direction or movement with your initial lines will give your mountain drawing a sense of natural rhythm. It is about observing the big picture first, before you get lost in the smaller, more intricate parts. This approach, quite honestly, makes the whole process less intimidating and more enjoyable.
Once you have a basic outline that you are happy with, you can then start to refine those lines, making them a little darker where you want them to be more defined. But remember, the goal here is just the broad shape. You are essentially creating a simple map for where everything else will go. This initial sketch is the backbone of your mountain drawing, providing a clear starting point for all the fun details you will add later, in fact.
How Can You Learn Mountain Drawing Step-by-Step?
Learning to draw a mountain, especially for someone just starting out, is truly a process that can be broken down into clear, manageable steps. It is not about having some innate talent, but rather about following a series of actions that build upon each other. Think of it like learning to bake a cake; you follow a recipe, step by step, and before you know it, you have something wonderful. This approach makes the whole activity much less overwhelming, frankly.
Many resources out there offer simple, guided ways to put these grand shapes onto paper. These guides often begin with the very basic forms, like triangles or trapezoids, and then show you how to gradually add more natural-looking curves and details. You will find that by breaking down a complex mountain shape into these simpler geometric forms, it becomes much easier to tackle. It is a bit like building with blocks, really.
For example, a typical step-by-step approach might first have you sketch a light, basic outline of the mountain's overall shape. Then, it might guide you to add some smaller peaks or ridges within that larger form. After that, you might move on to suggesting areas of rock or snow, and then, perhaps, to adding some initial shading. Each step builds on the last, giving you a clear path forward, which is, you know, pretty helpful for anyone learning something new.
Some guides even provide a collection of ideas, perhaps 25 different mountain drawing concepts, complete with simple outline sketches. These can be incredibly useful for practice, giving you varied examples to work from without having to come up with everything on your own. You can even find printable pages that you can trace or color in, which is a fantastic way to get comfortable with the shapes and lines before you try drawing them freehand. It is all about building confidence, in fact.
The key is to take your time with each step and not rush ahead. If a particular part feels a little tricky, just practice it a few times until it feels more natural. Remember, drawing is a skill that improves with consistent effort, not just a single attempt. So, by following these step-by-step methods, you will certainly be able to create your own mountain drawings with a good deal of ease and satisfaction, naturally.
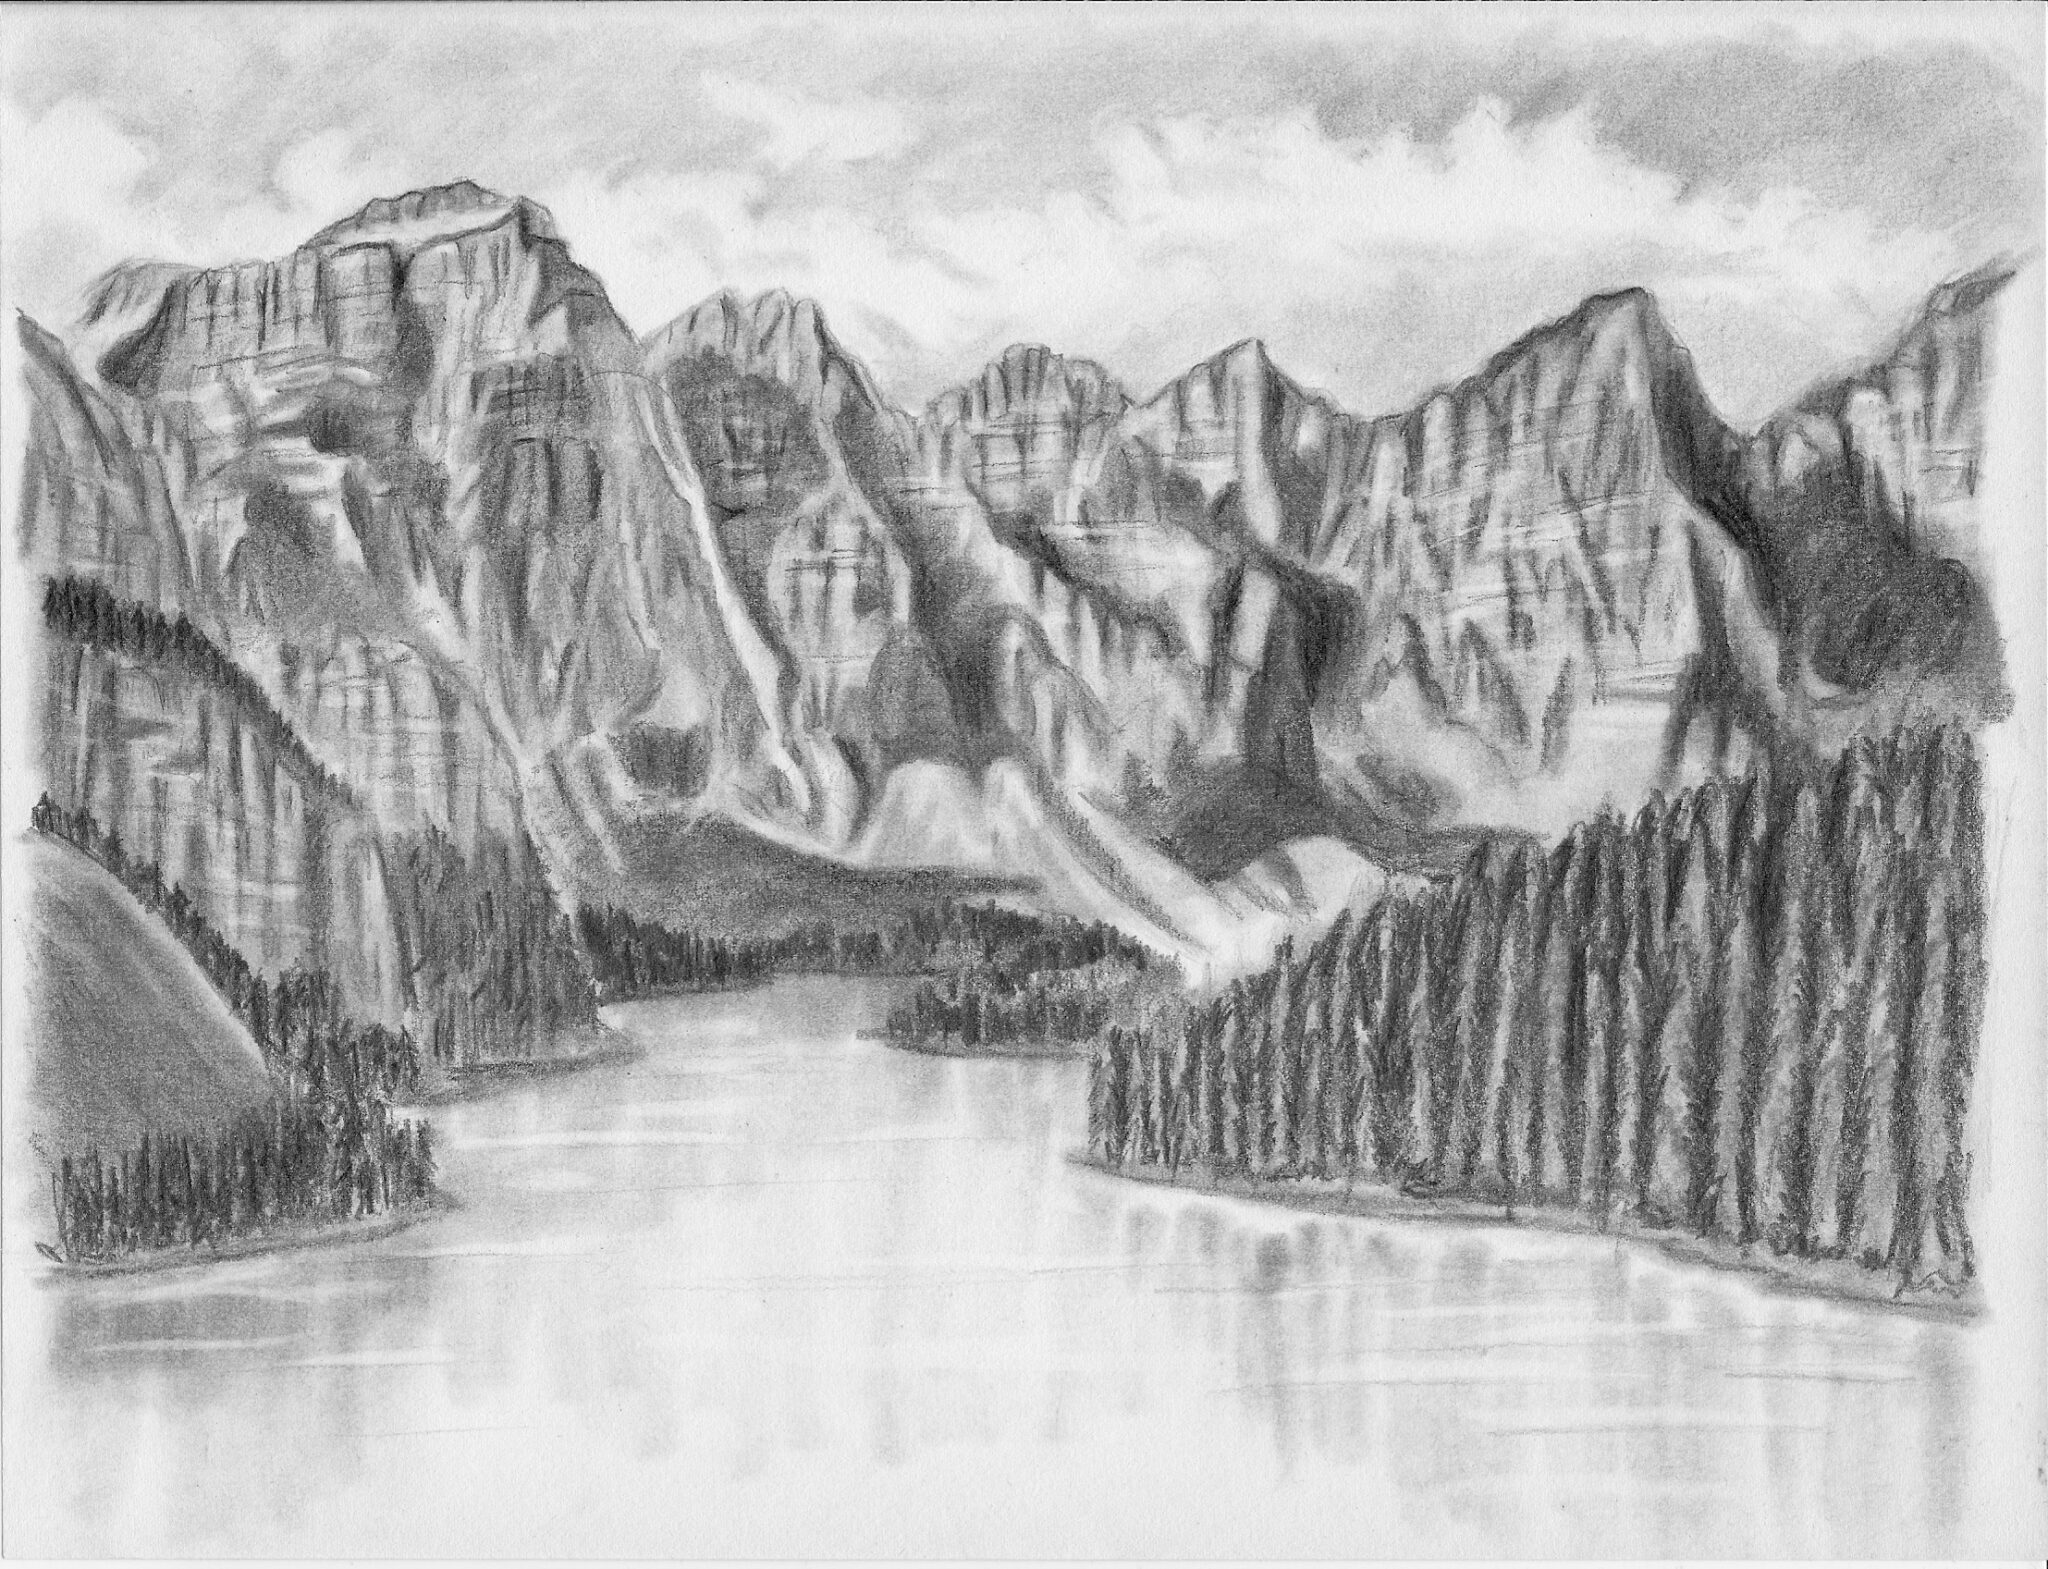
Adding Depth to Your Mountain Drawing
Once you have the basic outline of your mountain drawing down, the next exciting part is giving it a feeling of solidness and distance. This is where light and shadow come into play, which are, quite frankly, some of the most powerful tools an artist has. Learning how to put these elements into your pictures of mountains is a truly wonderful way to make them look less flat and more like actual, three-dimensional forms reaching into the air. It is about making your drawing pop, in a way.
Think about where the light source is coming from. Is the sun high in the sky, casting short, strong shadows? Or is it low on the horizon, creating long, dramatic streaks of darkness? The direction of the light will determine which parts of your mountain are illuminated and which fall into shadow. This decision, you see, dramatically changes the mood and appearance of your entire picture. It is a fundamental choice that guides all your shading work, naturally.
Areas that face the light will appear brighter, while those turned away will be darker. But it is not just about dark and light; it is also about the gradual shift between them. A gentle slope might have a soft transition from light to shadow, while a sharp, jagged peak might have a very sudden, clear division. Capturing these subtle changes in tone helps to describe the mountain's unique contours and textures, making it feel more real, in fact.
You can use different shading techniques to achieve this. Hatching (drawing parallel lines), cross-hatching (drawing intersecting lines), or even just simple blending with your finger or a blending tool can create varied effects. Experiment with these methods to see which ones help you best convey the rocky surfaces, snowy caps, or forested slopes of your mountain. The more varied your marks, the more interesting your mountain drawing will look, too it's almost like giving it character.
Adding shadows also helps to separate different parts of the
Mountain Landscape Drawing at GetDrawings | Free download
How to Draw Mountains Near a Beautiful Lake - Let's Draw Today

How to Draw Mountains - Really Easy Drawing Tutorial
