Guitar Drawing - Your Creative Path
Have you ever thought about making a picture of a guitar with your own hands? It's a rather fun activity, and actually, it's more straightforward than you might think. Many folks find the idea of putting a guitar on paper a little bit exciting, perhaps because these instruments themselves are so captivating. Whether you are just starting out with art or you have been sketching for a while, there are ways to approach this that can make it a genuinely rewarding experience. It's almost like learning a new song, but with pencils and paper instead of chords.
You see, creating a visual representation of a guitar doesn't have to be a big challenge. There are plenty of helpful guides and easy-to-follow steps out there, just waiting for you to discover them. These methods are put together to help anyone, regardless of their prior experience, bring a guitar to life on a page. It's about breaking down something that seems quite intricate into smaller, more manageable pieces, which makes the whole process feel much less intimidating.
So, if you are looking to try your hand at making a picture of a guitar, you have certainly come to a good spot. This discussion will walk you through some of the basic ideas and helpful tips that can get you started. It's really about finding the right way to begin and then adding your own personal touches as you go along.
Table of Contents
- Getting Started with Your Guitar Drawing
- What Do You Need for a Guitar Drawing Project?
- Exploring Different Looks for Your Guitar Drawing
- How Do You Build a Guitar Drawing Step by Step?
- Adding Those Extra Touches to Your Guitar Drawing
- Where Can You Find Inspiration for Your Guitar Drawing?
- A Little Bit of Guitar History and Its Influence on Guitar Drawing
- Wrapping Up Your Guitar Drawing Adventure
Getting Started with Your Guitar Drawing
Making a picture of a guitar can be a very satisfying creative activity, you know? Many people find that watching a video can be a truly helpful way to pick up new skills. It's like having someone right there with you, showing you exactly what to do. You can see the hand movements, the way the lines come together, and how the shapes form. Following along with steps that are easy to understand can help anyone make a picture of a guitar that looks quite neat. It's a pretty satisfying feeling, actually, to see your own hand create something like that, especially when it turns out just the way you wanted it to. This kind of visual aid really simplifies the process, making it accessible for nearly everyone.
With a good guide, the act of making a guitar picture becomes much less difficult. These guides are usually put together in a way that breaks down the whole shape into smaller, more manageable parts. This means you don't have to worry about getting every single curve just right from the very beginning. Instead, you can focus on one small piece at a time, and before you know it, all those pieces will come together to form the complete instrument. It's a gentle way to learn, building confidence with each little success.
Learning how to make a picture of a guitar, following a guide that takes you through each stage, can be a really enjoyable art lesson. These lessons are often designed to be quite easy to follow, making sure that you feel supported throughout your creative time. You get to learn at your own pace, trying out each part until you feel good about it. This approach means that anyone, whether they are just starting out or have been drawing for a little while, can pick up the skills needed to create a guitar picture.
What Do You Need for a Guitar Drawing Project?
To get going with your guitar drawing, you won't need a whole lot of fancy items, which is rather good news. You will want some basic shapes to start with, as these form the foundation of your instrument. Think about simple forms like circles, rectangles, and maybe some ovals; these are pretty much the building blocks for any guitar. Having these shapes in mind or sketching them lightly on your paper first can really help you get the overall outline correct before you add any of the smaller details.
Then, you will probably want some markers or pencils, depending on the look you are going for. Pencils are great for initial sketches because you can easily adjust lines if you need to. Markers, on the other hand, can give your guitar drawing a bold, finished look, especially if you are adding color. The kind of paper you use matters a little bit too; a smoother surface often works well for detailed work, but any paper will do when you are just practicing.
And of course, you will need just a little bit of practice to create your own guitar drawings. It's not about being perfect right away, but about trying things out and getting a feel for the shapes and lines. Every time you try, you learn something new, and your hand gets a little bit more comfortable with the movements. This consistent effort is what truly helps you improve and eventually make a picture of a guitar that you are really happy with. So, don't worry about making mistakes; they are just part of the learning process.
Exploring Different Looks for Your Guitar Drawing
When you are making a picture of a guitar, you get to choose between a cartoon style or one that looks more like a real instrument, which is pretty neat. A cartoon guitar might have exaggerated features, bigger tuning pegs, or a more simplified body shape, making it feel playful and fun. This approach gives you a lot of freedom to be creative and not worry too much about perfect accuracy. It's a great way to add a bit of personality to your guitar drawing.
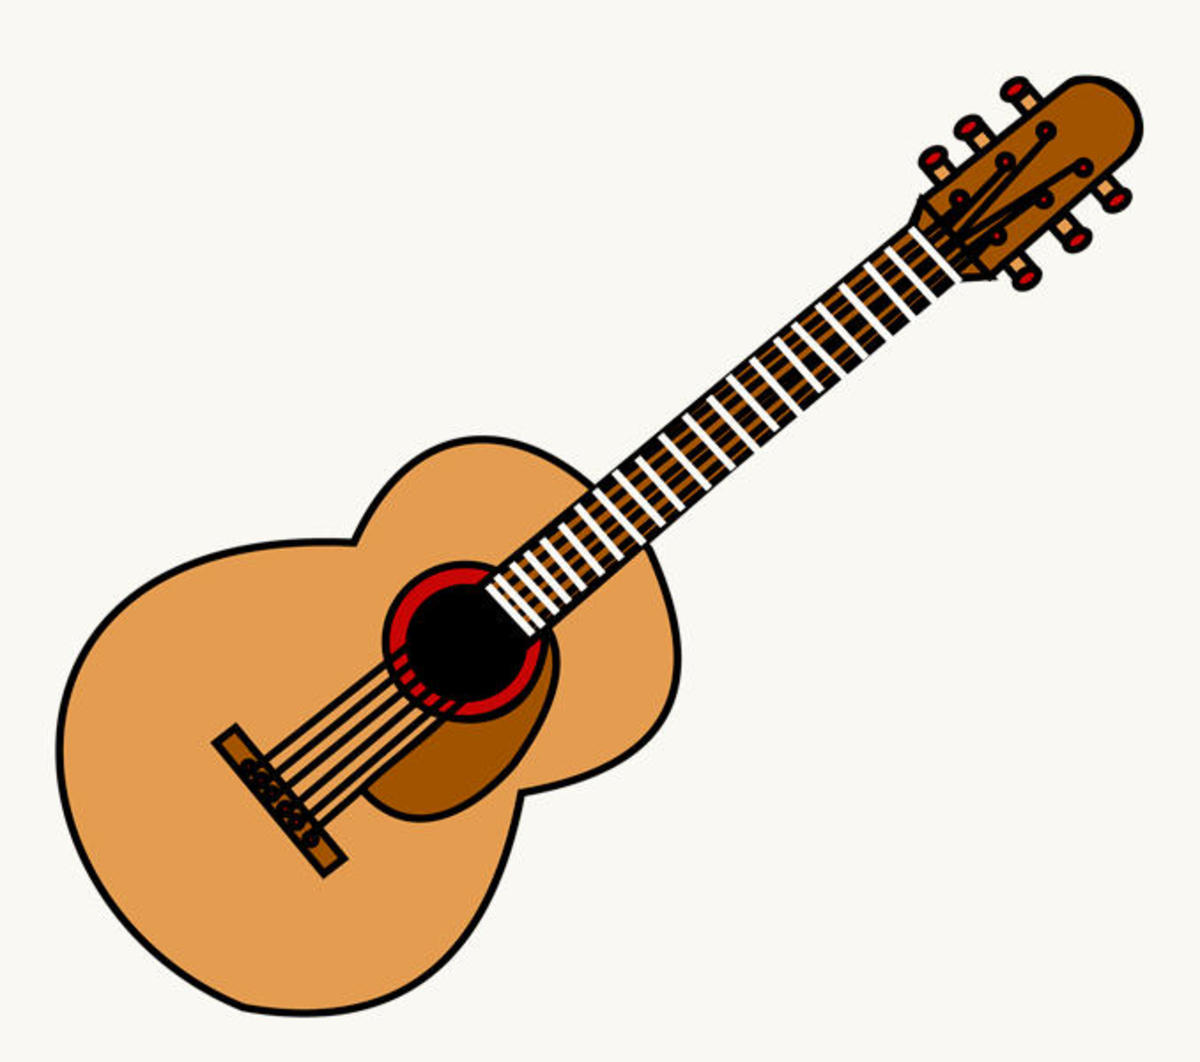
On the other hand, if you prefer a look that is closer to how a real guitar appears, you can focus on adding details like the strings, the frets along the neck, the soundhole, and the tuning keys. These smaller parts are what make a guitar recognizable and give it a sense of realism. Paying attention to these elements can make your picture feel more authentic, almost like you could reach out and play it. It's a bit more involved, but the results can be very rewarding.
You can learn how to make a picture of a guitar by starting with basic shapes and then adding these sorts of details. This method works for all kinds of guitars, from the acoustic models that have a big, hollow body to the electric ones with their sleeker designs. Understanding the fundamental shapes of each type of guitar helps you get the main form right, and then you can layer on the unique characteristics that make it an acoustic or an electric. This flexibility means you can make many different kinds of guitar drawings.
How Do You Build a Guitar Drawing Step by Step?
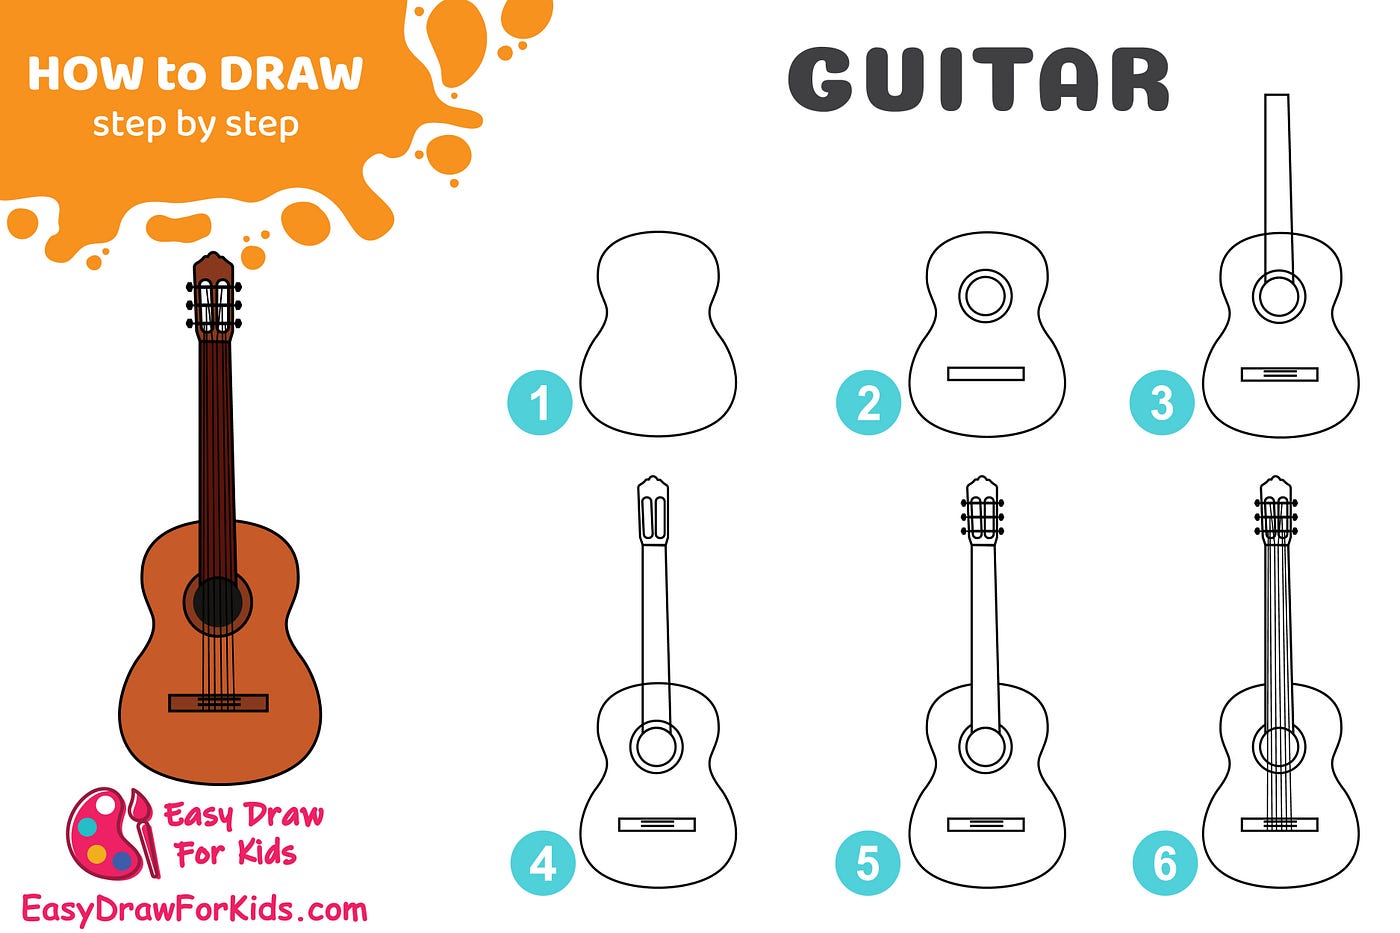
Following steps to sketch the outline is usually the first thing you do when making a guitar picture. This means drawing the very basic shape of the instrument, without any of the finer points. It's like creating a rough blueprint, just to get the overall size and placement right on your paper. This initial outline helps you to avoid having to erase a lot later on, as you can easily adjust these light lines.
Next, you would typically work on the body of the guitar, giving it its distinct shape, whether it is an acoustic's roundness or an electric's more angular design. After that, you move to the neck, which is the long part where the strings run. Then comes the headstock, which is the piece at the very top of the neck where the tuning pegs are located. These parts are fundamental to the guitar's structure, so getting them somewhat right is important for a believable guitar drawing.
After the main structure is in place, you can start adding the frets, which are the metal strips on the neck that help musicians change notes. Then, you put in the strings, making sure they run neatly from the headstock all the way down to the body. You might also want to think about shading, which can give your guitar drawing a sense of depth and make it look more three-dimensional. Adding music notes floating around the guitar or giving it some color can really bring your picture to life, making it feel complete.
Learning how to make different types of guitars with easy and detailed instructions can be quite a fun project. You can choose from simple pictures, or electric guitar drawings, or even a Mickey Mouse guitar drawing if you are feeling playful. Each type has its own particular shapes and details, but the general step-by-step approach remains pretty much the same. This allows you to try out various styles and see what you enjoy making the most.
Adding Those Extra Touches to Your Guitar Drawing
If you are making a guitar picture, and you want to make it even more interesting, you can stop after getting the basic shape down, or you can keep going to add more details. For instance, putting three small circles at the top for the tuning pegs, and then drawing lines for the guitar's strings, makes a big difference. These small additions truly bring the instrument to life on your paper. It's almost like giving it a voice, even though it's just a picture.
This approach of starting simple and then adding more as you feel comfortable is quite good for everyone, including kids who might want to give it a try. It means you don't have to feel overwhelmed by all the little bits at once. You can just enjoy the process of creating something, bit by bit. This kind of step-by-step method shows you four ways to make different types of guitars, among them a classic looking guitar and a more modern one.
Here is how to make a picture of a guitar, one with a classic kind of look. The guide that takes you through each stage shows how to add the strings and other small pieces in the correct places. This attention to where things go makes your guitar picture look believable and well put together. It's these little things that truly make a picture stand out.
Where Can You Find Inspiration for Your Guitar Drawing?
Hello creative folks, watching a video can show you how to make and color a guitar picture. Following a guide that takes you through each stage can help you learn how to make your own. These visual aids are often very helpful because you can pause, rewind, and really take your time to understand each stroke. It’s like having a patient teacher right there on your screen, guiding your hand.
For example, learning how to make an acoustic guitar picture, picking up drawing skills from this kind of guide, is good for both younger people and grown-ups. The instructions are usually clear and straightforward, making it easy for anyone to follow along. It’s a wonderful way to spend some creative time, whether you are looking for a simple art project or something a bit more involved.
You can learn how to make a picture of a guitar, stage by stage, with these many easy guitar picture ideas for people of every age looking for a simple art project. This kind of detailed guide will help you create a picture of a guitar that looks quite real, starting from the basic outlines. Guitars are one of the things that many people find quite appealing to look at, so it makes sense that they are a popular subject for making pictures.
Learning how to make a picture of a great looking guitar with easy drawing instructions and a video guide is quite accessible. By following the steps that are not complicated, you too can easily make a picture of a guitar that looks just right. You can see examples of different styles and ways of doing things by English artists and get tips for improving your own work. This exposure to various approaches can really broaden your own creative horizons.
A Little Bit of Guitar History and Its Influence on Guitar Drawing
Starting off, I always liked music, and guitars fascinated me the most, you know? The sounds they make and the variety of their designs always caught my eye. So, I decided one day I would learn to make pictures of them. This personal connection to the instrument often sparks the desire to draw it, making the creative process even more meaningful. It's a way of expressing that appreciation through art.
You can connect with classic sounds, whether you like country music, rock, or something in between, when you think about guitars. The instrument itself has a rich history, going back over approximately 4,000 years. Before electric guitars and synthetic materials were developed, guitars were made in ways that shaped their look and feel. This long history means there are so many different styles and shapes to draw from, offering endless possibilities for your guitar drawing.
The guitar itself is made of a hollow wooden body with six strings stretched over it and along a narrow neck. Guitars usually have a single, round sound hole in the body. Knowing these basic parts helps you understand what you are trying to make a picture of. For example, learning how to make a picture of a guitar simply, stage by stage, often begins with drawing the guitar's body first.
Next, you would typically make a picture of the neck and the head, which is the top part. Then, you add the sound hole. These are the fundamental pieces that make a guitar look like a guitar. Electric guitars use a pickup to turn the vibration of the string into electrical signals. This was thought up in 1931, which is a fairly recent development in the long history of the instrument. Understanding these aspects, even a little bit, can inform how you approach your guitar drawing.
Wrapping Up Your Guitar Drawing Adventure
So, we have gone over how making a guitar picture can be a truly enjoyable creative activity, starting with easy steps and basic shapes. We talked about needing simple tools like pencils and markers, and how a little practice can make a big difference. We also looked at choosing between cartoon or realistic styles and adding important details like strings and frets. Remember, there are many types of guitars to explore, and plenty of places to find inspiration for your own guitar drawing.
Step-by-Step: How to Draw a Guitar | FeltMagnet

How to Draw an Acoustic Guitar: 15 Steps (with Pictures) - wikiHow
How To Draw A Guitar Step By Step Easy
