Crafting Beautiful Paper Snowflakes - A Simple Guide
There is something truly special about making things with your hands, and few crafts offer the quiet charm and easy pleasure of paper snowflakes. These delicate, lacy creations bring a touch of winter wonder indoors, no matter the weather outside your window. It is a time-honored activity, cherished by many for its straightforward approach and the lovely results it brings. You can, too, find a calm sort of joy in shaping paper into something so pretty.
This activity is a real favorite for people of all ages, from the smallest hands just learning to hold scissors to older folks who enjoy a peaceful, creative pastime. It is a wonderfully inexpensive way to add a bit of seasonal cheer to your surroundings, needing just a few basic supplies. You might remember doing this as a child, perhaps in school or at home with family, and that sense of warm memory is part of its lasting appeal, you know.
Making paper snowflakes is not just about cutting paper; it is about creating unique pieces of art, as no two will ever look exactly the same, which is rather nice. Each one you make holds its own little design, a testament to your personal touch. This guide will walk you through the simple steps to create your very own collection of these lovely paper decorations, showing you how to make paper snowflakes with ease, so you can fill your home with a gentle, frosty beauty.
Table of Contents
- How Do You Start Making Paper Snowflakes?
- How to Make Paper Snowflakes - The Folding Steps
- How to Make Paper Snowflakes - The Cutting Part
- How to Make Paper Snowflakes - Where Can You Put Them?
- How to Make Paper Snowflakes - Why Is This Craft So Good for Everyone?
How Do You Start Making Paper Snowflakes?
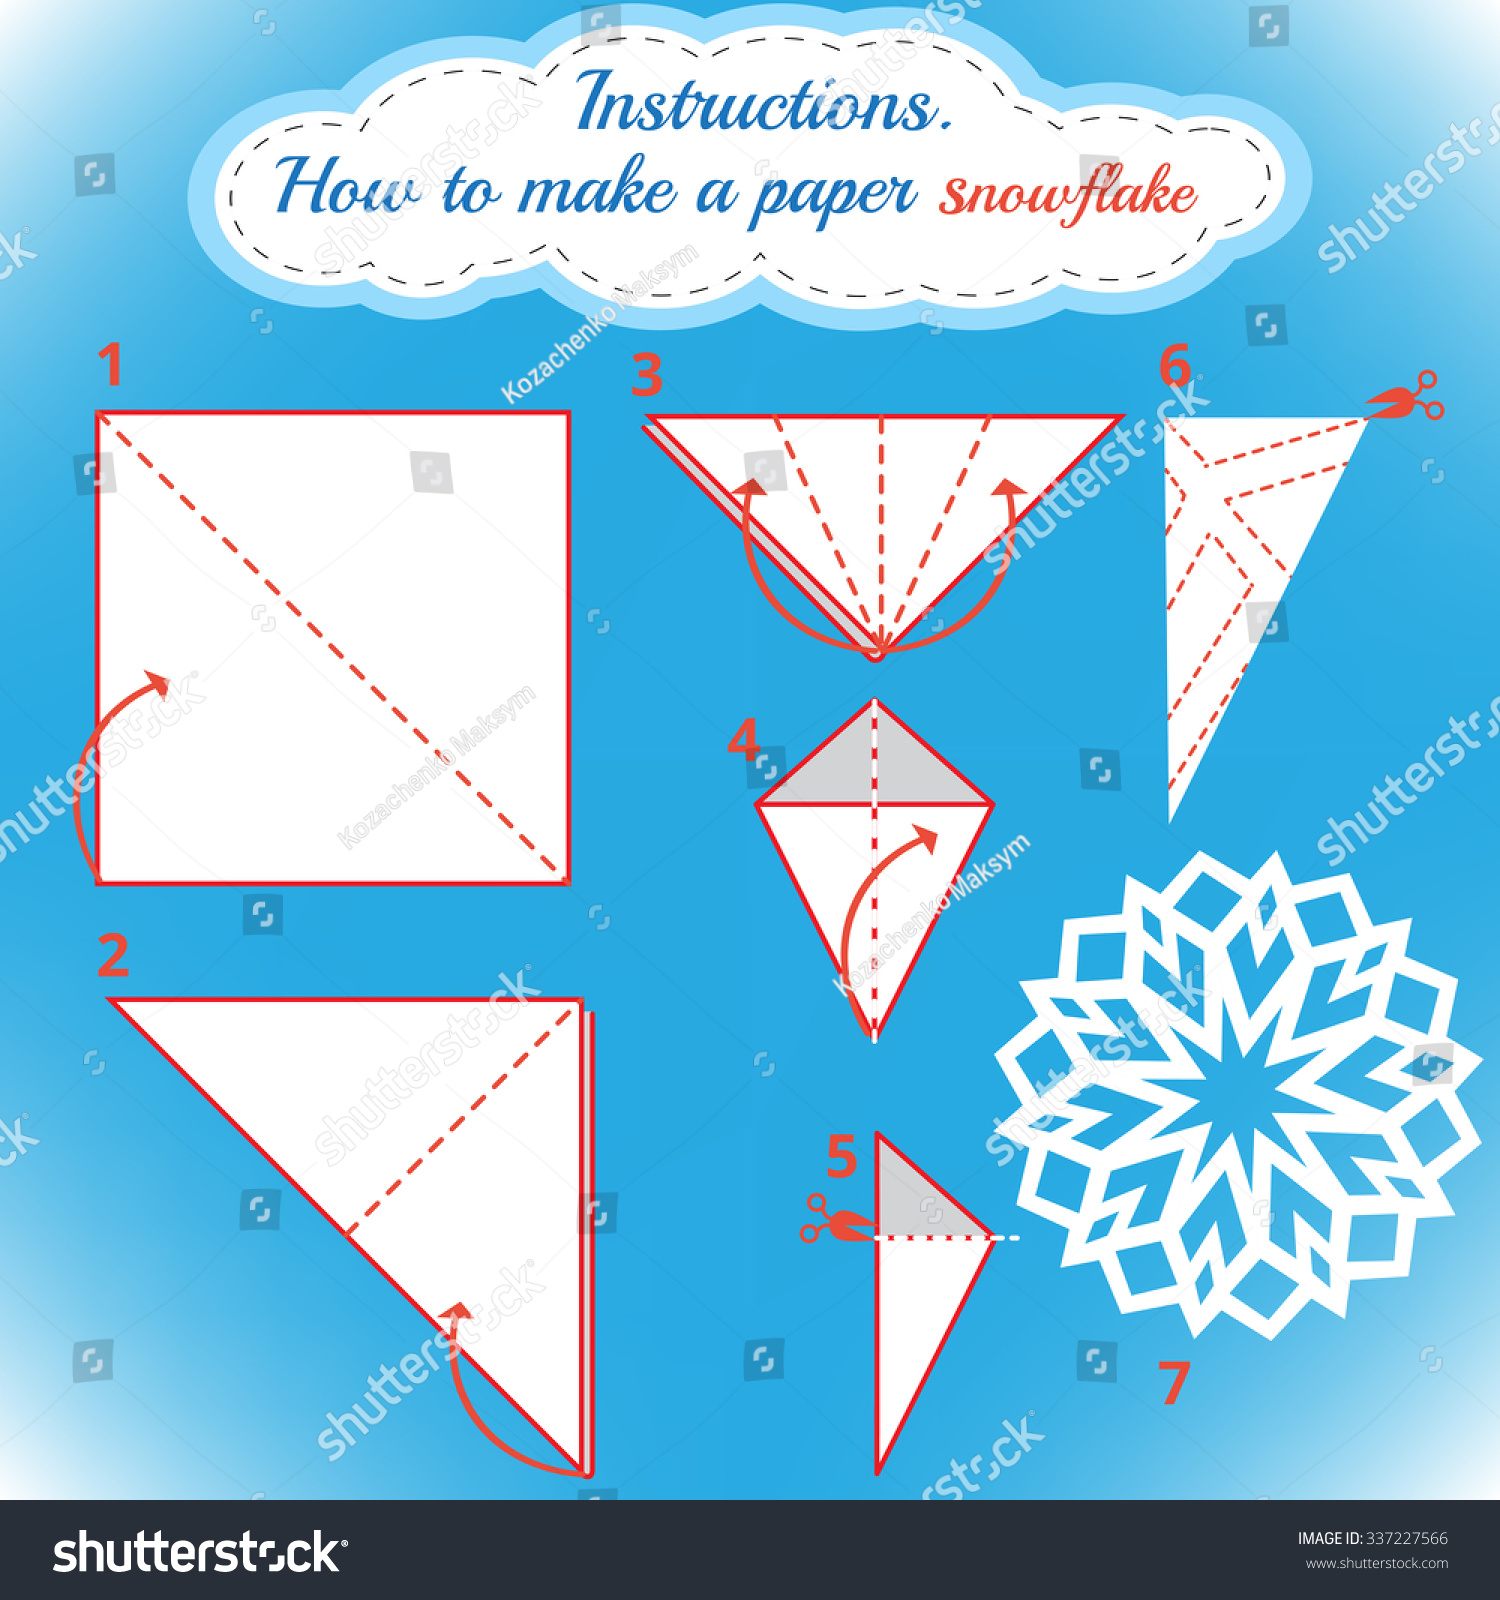
Beginning your paper snowflake project is a truly simple affair, which is part of its charm. The first step, and perhaps the most important, involves getting your paper ready. You see, the shape of your starting paper will determine the overall look of your finished snowflake. Most often, people begin with a piece of paper that is perfectly square, because this shape allows for the most symmetrical and balanced designs once folded. It is really quite straightforward to get this right, and it sets you up for success with your paper snowflake creation. You could, for instance, use a standard piece of printer paper and simply trim it down.
If you are using a regular rectangular sheet of paper, like the kind you might find in a printer, you will need to turn it into a square. This is a common part of learning how to make paper snowflakes. You can do this by taking one corner and folding it over to meet the opposite edge, creating a triangle shape. The part of the paper that sticks out beyond this triangle will be excess, and you will simply snip that part away. This gives you a neat, even square, which is absolutely what you want for a well-formed snowflake. It is a little trick that makes all the difference, honestly.
Once you have your square, you are ready to move on to the folding, which is where the magic really begins to happen. This initial preparation step is quick, yet it is key to ensuring your snowflake has that classic, beautiful form. It is a fundamental part of the process, and you will find it becomes second nature after just a few tries. So, just get your paper squared up, and you are well on your way to making some lovely decorations, you know.
What things do you need to make paper snowflakes?
Gathering your supplies for making paper snowflakes is incredibly easy, as you likely have most of what you need already at home. The main item, of course, is paper. Plain white printer paper works wonderfully, offering a crisp look that really shows off your cut designs. However, you are not limited to white; you could try colored paper, or even paper with a slight sheen for a different effect. The thickness of the paper matters a little; something too thick might be hard to cut through all the layers, while something too thin could tear easily, so a standard weight is often best, in a way.
Next up, you will need a good pair of scissors. For smaller hands, child-safe scissors are a must to ensure safety and comfort during the cutting process. For older folks, any sharp pair of craft scissors will do the trick. The sharper your scissors, the cleaner your cuts will be, which helps your snowflake look its best. It is really quite important to have scissors that can handle cutting through several layers of paper without much trouble, you know.
Beyond these two basic items, everything else is really just an extra touch. You might want a pencil to lightly mark your folds or design ideas, though many people just freehand their cuts. If you plan to hang your snowflakes, a bit of string, thread, or even some clear fishing line can be useful. For decorating them after they are made, things like glitter, markers, or even small sequins could be fun, though they are certainly not necessary to enjoy the main activity. So, basically, paper and scissors are your core needs, and the rest is up to you.
How to Make Paper Snowflakes - The Folding Steps
The folding process is where the true structure of your paper snowflake takes shape. It is a sequence of simple folds that, when done correctly, create the foundation for a symmetrical, multi-pointed design. Each fold builds upon the last, making the paper smaller and thicker in sections, which then allows your cuts to create intricate patterns across the entire piece when unfolded. This part of how to make paper snowflakes is key to getting that classic look. It is almost like a little puzzle, where each step reveals the next part of the picture, you see.
You begin with your perfectly square piece of paper. The goal here is to get a shape that resembles a triangle with several layers. This specific folding method is what gives snowflakes their characteristic six points, though you can experiment with other folding patterns for different numbers of points later on, if you feel like it. But for now, sticking to the traditional way is a good starting point for learning. It is a rather calming activity, just folding and pressing the creases, you know.
The neatness of your folds truly matters here. Pressing down firmly along each crease helps keep your paper from shifting while you cut, which can lead to a much cleaner final product. If your folds are a bit messy, your snowflake might not look as even, but it will still be charming in its own way. The beauty of this craft is that even imperfections can add to its unique appeal. So, take your time with each fold, and enjoy the process of shaping your paper, you know.
How to Make Paper Snowflakes - Shaping Your Paper
Once you have your square piece of paper, the first fold is a diagonal one. Take one corner and bring it over to meet the opposite corner, making sure the edges line up as closely as possible. Then, press down firmly along the crease to create a crisp fold. This will give you a large triangle. This initial step is really important for setting up the symmetry of your snowflake. It is almost like drawing a line right through the middle of your paper, only you are doing it with a fold, which is quite clever, actually.
After you have your first large triangle, you will fold it in half again. Take one of the points of the triangle and bring it over to meet the other point, folding the triangle in half. Again, make sure your edges are aligned and press down to create another clear crease. This will result in a smaller triangle. This step just further prepares your paper for the intricate cuts you will make later. It is a simple movement, but it adds another layer to your paper, which is what allows for the complex patterns to emerge, you know.
This process of folding in half repeatedly is what creates the multiple layers you will cut through. The more folds you make, the more points your snowflake will have, and the more detailed your cut-out design can become. It is a straightforward process, but each precise fold helps ensure your snowflake unfolds into a beautiful, balanced shape. So, just keep folding neatly, and you are doing it right.
How to Make Paper Snowflakes - Folding into a Pointy Shape
After you have folded your paper twice to create a smaller triangle, you are ready for the next crucial fold that will give your snowflake its classic six-pointed design. This step can feel a little different from the previous ones, but it is still quite simple. You will take your triangle and fold it into thirds, or roughly thirds, making sure the three points at the bottom meet up more or less in the same spot. It is a bit like folding a fan, where you are creating equal sections, you know.
To do this, take one side of your triangle and fold it inward, aiming for it to cover about one-third of the total triangle. Then, take the other side and fold it over that first fold, making sure it lines up. When you look at it, you should see three distinct sections, all layered on top of each other. This particular fold is what creates the six "arms" of your snowflake when it is opened up. It is a fairly clever way to get that specific number of points, actually.
Once you have made these folds, you will notice that the top edge of your paper might not be perfectly straight. That is completely fine and quite common. You will likely have some excess paper sticking out at the top, which you will trim off in the next step. This prepares your paper for the cutting stage, giving you a neat, layered shape to work with. So, just focus on getting those three sections layered nicely, and you are doing great.
How to Make Paper Snowflakes - Adding More Folds
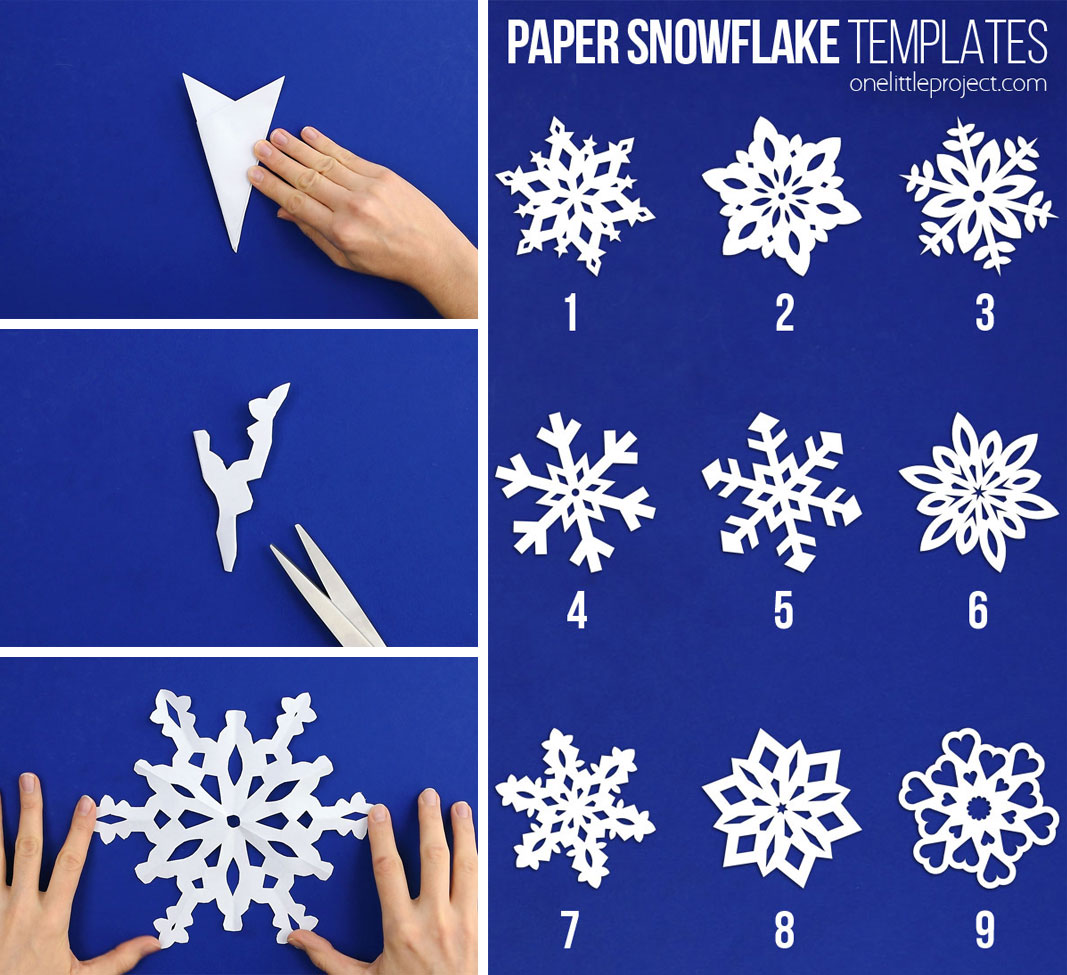
After you have made the three-part fold, you will have a somewhat irregular, layered shape. The next step is to make this shape ready for cutting by evening out the top edge. You will want to cut straight across the top, removing any uneven bits and creating a clean, flat edge. This cut is important because it will form the outer edge of your snowflake, so a neat line here will make your final product look much tidier. It is a fairly quick snip, but it makes a difference, you know.
Once you have trimmed the top, you will have a more defined, compact shape, often resembling a narrow, pointy triangle or cone. This is the piece of paper you will now begin to cut into. All the layers are now stacked together, waiting for your creative snips. This folded shape is what allows for the symmetrical patterns to appear when you unfold your creation. It is pretty cool how simple folds can lead to such intricate designs, in a way.
Remember, the more folds you have, the more delicate and detailed your snowflake can become. Some people even fold their paper one more time after this step, to create an even smaller, thicker shape. This allows for even finer cuts and more elaborate patterns, but it also makes the paper harder to cut through. For beginners learning how to make paper snowflakes, sticking to just a few folds is a good idea. You can always try more complex folding as you get more comfortable, which is nice.
How to Make Paper Snowflakes - The Cutting Part
Now comes the truly fun and creative part of making paper snowflakes: the cutting. This is where your unique design comes to life. With your folded paper, you will use your scissors to make small snips and cuts along the edges and even into the folded layers. The key is to remember that whatever you cut away will be a hole in your final snowflake, and whatever you leave behind will form the solid parts of the design. It is almost like drawing with scissors, you know, which is pretty neat.
You can make all sorts of cuts: tiny triangles, half-circles, wavy lines, or even small, irregular shapes. Try to vary the size and shape of your cuts to create different effects. Cutting into the folded edges will create patterns that repeat around the center of your snowflake, while cutting into the open edges will create patterns that appear along the outer rim. It is a good idea to not cut too much off the main folded lines, as this can make your snowflake fall apart, which would be a bit of a shame.
The beauty of this step is that there is no right or wrong way to cut. Every snip you make contributes to a unique design. Even if you think you have made a mistake, it often turns into an interesting feature once the snowflake is unfolded. This part of how to make paper snowflakes is all about letting your imagination lead the way. So, just grab your scissors and start snipping away, experimenting with different shapes and sizes, you know.
How to Make Paper Snowflakes - Should You Use a Pattern or Just Cut?
When it comes to the cutting part of making paper snowflakes, you have a couple of main paths you can take: using a pre-made pattern or simply cutting freehand. Both approaches have their own charm and can lead to beautiful results. If you are just starting out, or if you want a particular look, using a printable template can be a really helpful way to guide your cuts. These templates often have lines drawn on them, showing you exactly where to snip, which can take some of the guesswork out of the process, you know.
Many people find that using templates helps them learn the kinds of cuts that create interesting patterns. You can find templates for all sorts of designs, from simple shapes to very detailed, intricate ones. Following a guide can also help you create snowflakes that look quite similar to each other, which can be nice if you are aiming for a cohesive decorative theme. It is a good way to build confidence before you try your own designs, you see.
On the other hand, just starting to cut without a specific pattern can be incredibly freeing and creative. This is where the "no two snowflakes are exactly alike" idea really comes into play. You can simply make cuts as you feel inspired, letting the paper and your scissors guide you. This method often leads to surprisingly unique and artistic snowflakes, as each one is a direct expression of your own creativity. It is a very personal way to make paper snowflakes, and many people prefer this spontaneous approach, you know.
How to Make Paper Snowflakes - Where Can You Put Them?
Once you have unfolded your beautiful paper snowflakes, a whole world of decorating possibilities opens up. These delicate creations are incredibly versatile and can add a touch of winter charm to almost any part of your home. One of the most classic places to put them is on windows. Taping them to the glass, perhaps with a tiny piece of clear tape, allows them to catch the light and create a lovely, frosted look, almost as if real snow has settled there. They really do look quite magical against the light, you know.
Beyond windows, consider hanging them on your Christmas tree. They can be a wonderful, lightweight addition to your ornaments, filling in gaps or adding a homemade touch. You could also string several together to create a garland, draping them across a mantelpiece, along a doorway, or even around a staircase railing. This creates a flowing, festive decoration that is both simple and striking. It is a very effective way to bring that winter feeling into a room, actually.
Wreaths are another great spot for paper snowflakes. You can attach them to a plain green wreath to give it a unique, frosty appearance. They also look charming simply hung from the ceiling at varying heights, creating a whimsical, floating effect. Even placing them on shelves, tables, or as part of a centerpiece can add a subtle decorative element. The beauty of these paper pieces is that they are so light, they can be placed nearly anywhere without much fuss, which is quite convenient, you know.
Why Is This Craft So Good for Everyone?
Making paper snowflakes is an activity that truly brings people together, offering enjoyment for just about anyone, regardless of their age or skill level. For children, it is a fantastic way to practice fine motor skills, like holding scissors and making precise cuts, and it also encourages creative thinking. They get to see a simple piece of paper transform into something beautiful through their own efforts, which is a very rewarding experience. It is a very hands-on way to learn and play, you know.
For teens and tweens, it offers a calming break from screens and a chance to express themselves in a low-pressure setting. They can experiment with more intricate designs, pushing the boundaries of what a paper snowflake can be. It is a simple craft that still allows for a great deal of personal style and flair, which is quite appealing to that age group. They might even find it a bit meditative, which is rather nice.
Grown-ups and seniors also find a lot to love in making paper snowflakes. It can be a wonderfully relaxing pastime, a chance to unwind and engage in a quiet, creative pursuit. The simplicity of the materials and the repetitive nature of the folding and cutting can be very soothing. It is also a lovely way to connect with younger family members, sharing a classic activity and creating memories together. There is a certain timeless quality to it, you see, that appeals to all generations.
No matter what the weather outside might be doing, making paper snowflakes allows you to create your own little bit of winter magic indoors. It is a way to get into the holiday spirit, or just to enjoy a peaceful crafting session on a quiet afternoon. The satisfaction of unfolding a carefully cut piece of paper to reveal a unique, symmetrical design is a simple pleasure that never really gets old. It is a truly accessible and delightful activity for everyone, actually.
This article has covered how to make paper snowflakes, starting with the simple materials needed, like paper and scissors. We walked through the important folding steps, from shaping your paper into a square to folding it into a multi-layered triangle ready for cutting. We then explored the creative cutting process, discussing both using templates for guidance and the joy of freehand design. Finally, we looked at many ideas for decorating your home with these charming paper creations and discussed why this craft is such a wonderful activity for people of all ages.
Instructions How To Make Paper Snowflake. Tutorial Christmas Snowflake
How to Make Paper Snowflakes | One Little Project
:max_bytes(150000):strip_icc()/origami-snowflake-04-599ab3d3845b34001115da71.png)
How to Make an Origami Snowflake
